

The Marking Sheet Explained

The driving test marking sheet in Ireland is a structured checklist used by examiners to record a candidate’s performance across key competencies, including observational skills, vehicle control, positioning, signaling, speed management, and responses to hazards; it lists specific driving faults (minor faults), serious faults, and dangerous faults, with the test failed automatically if any dangerous fault or more than a set number of serious faults are recorded, while the tally of minor faults helps indicate areas for improvement; examiners also note the route, maneuvers attempted, and any supplementary comments, and the completed sheet is used to inform the post-test debrief and the official pass/fail outcome.

Dane Tadhg explains the marking sheet and everything you need to know about the marking sheet: Dane Tadhg clearly and calmly guides you through the RSA marking sheet, explaining each section so you know exactly how your driving test is assessed. He breaks down the difference between minors and majors, shows how observation, signalling, positioning and speed are scored, and highlights the critical manoeuvres that can lead to immediate failure if not performed safely. Dane also explains the fault categories, how points are tallied, and what constitutes a dangerous or serious fault versus a correctable minor fault. He points out where examiners note comments and why those notes matter for your learning, and he finishes by offering practical examples of common mistakes and simple corrections to improve your score — all delivered in a patient, professional manner familiar to learners at Dun Laoghaire Test Centre.
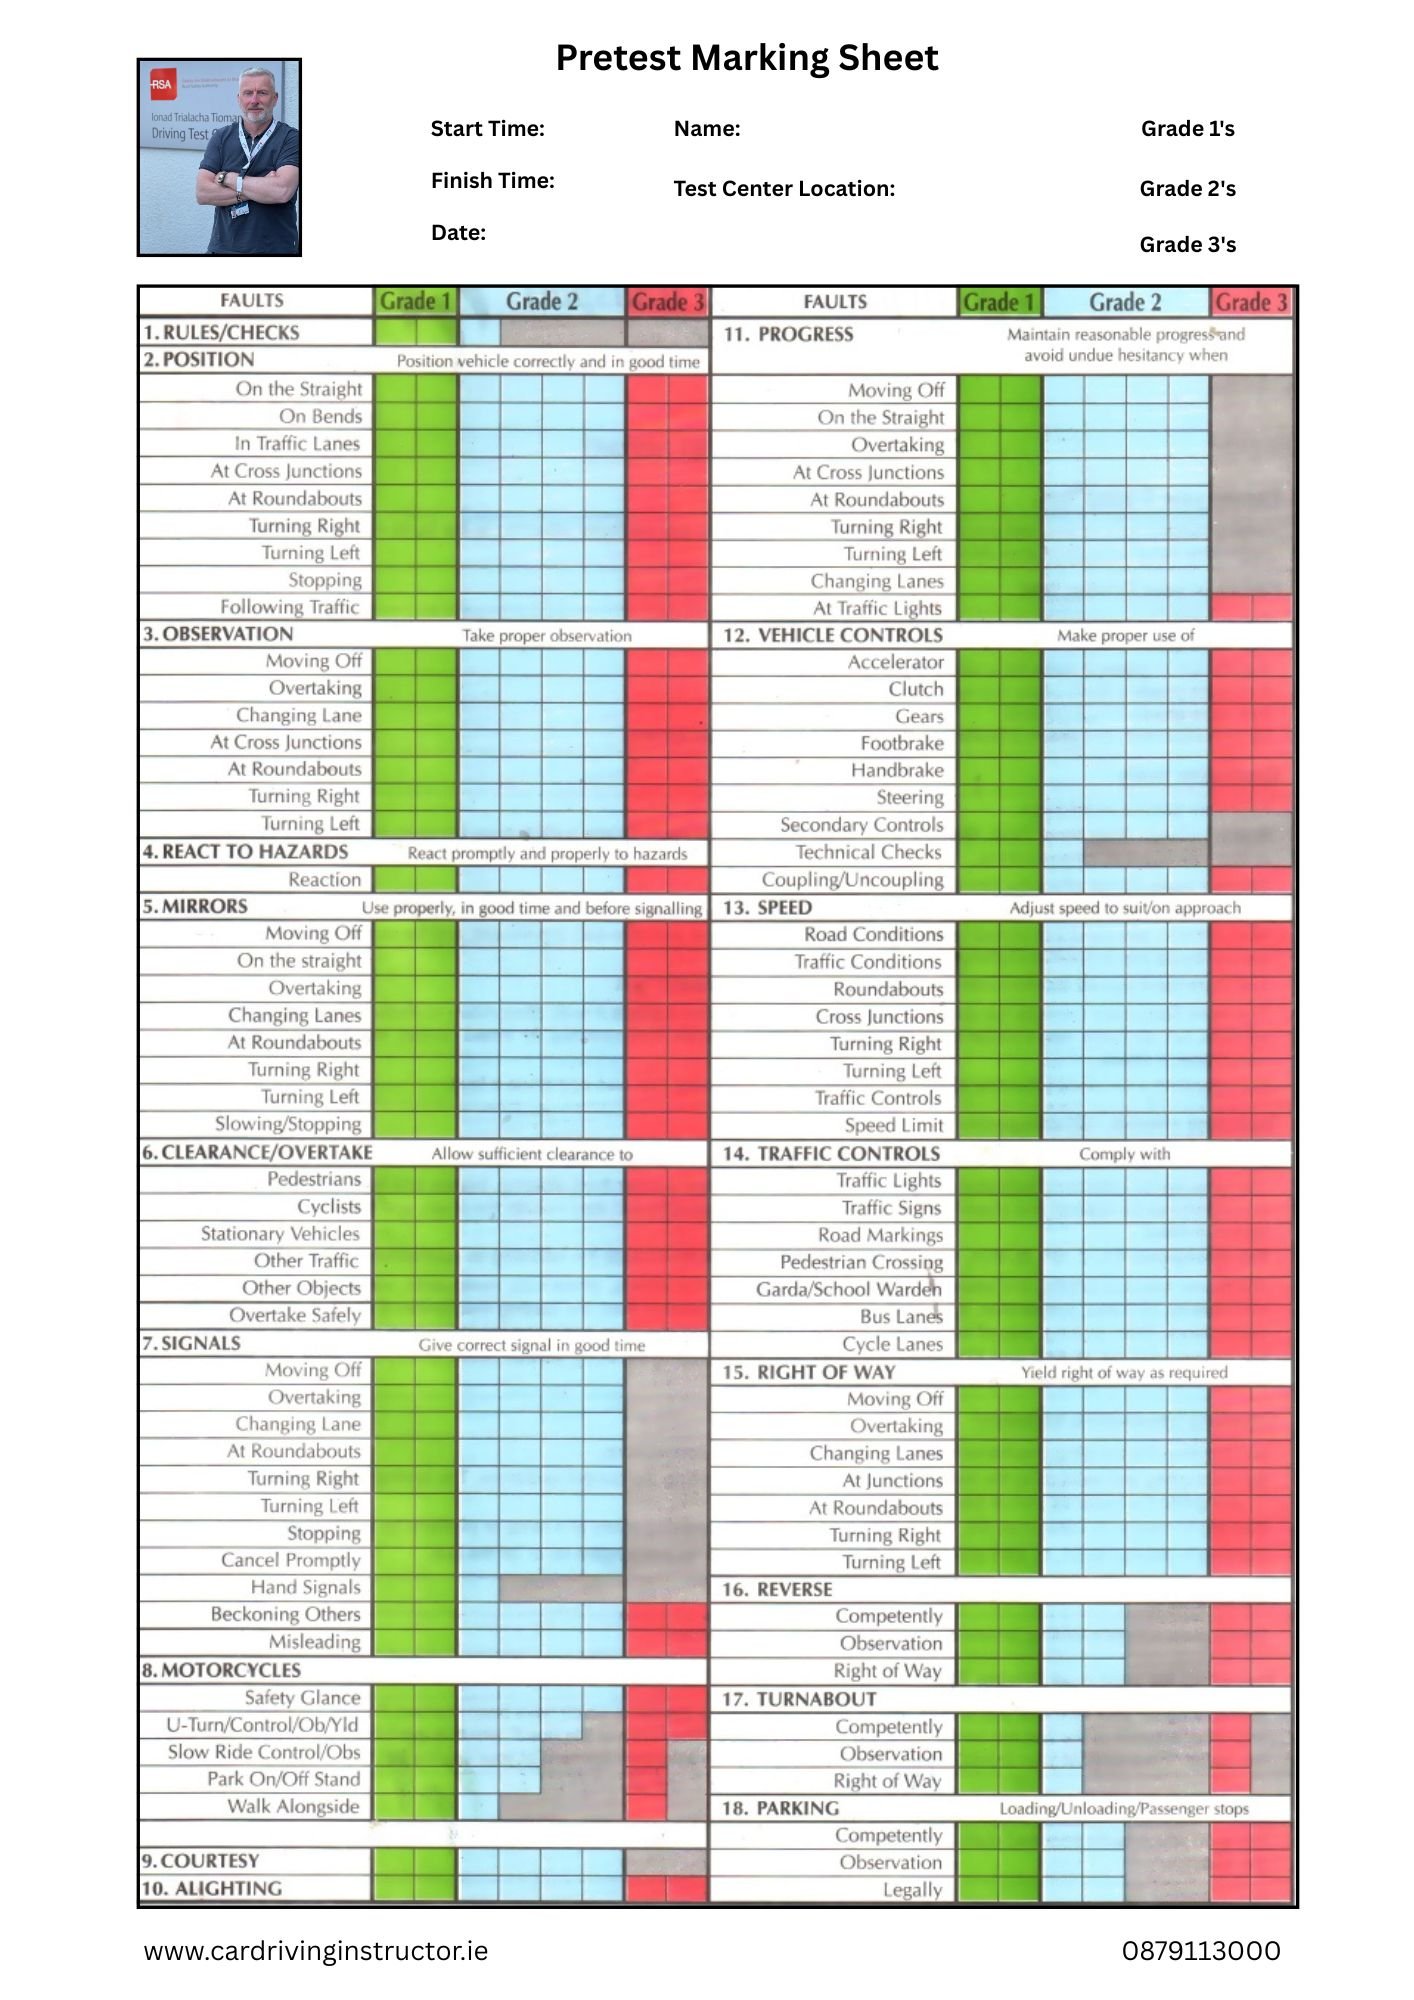
The Irish driving test (Category B — cars) uses a structured marking system based on driving faults and a point/demerit system. Below is a comprehensive breakdown of how marking works, what examiners look for, fault categories, point thresholds, automatic failure items, and important practical details.
Test structure and overall scoring
The test is scored by assigning faults rather than giving a numeric pass/fail score. Each observed error is categorised and may carry a certain number of “driver faults” (minor/serious) and sometimes “dangerous” classifications.
If the total number of accumulated driver faults (Blue Grade 2’s) reaches 9 or more during the test, the candidate fails. You are allowed 8 through out all categories. 6 within a category or 4 for the same issue ie Mirrors moving off.
Any single dangerous or serious fault Grade 3 Red in specific critical areas will also result in immediate failure
Grade 1 Green are very minor faults and do not impact your result.
The examiner records faults on the official test form and will tell you whether you’ve passed or failed at the end of the test.
Fault categories
Driver Fault (minor): A minor fault shows a lapse in skill, observation, or judgment but not severe enough to cause danger. These accumulate; reaching 15 fails the test.
Serious Fault: A serious fault indicates a serious lapse that could lead to danger if repeated, or a fact that significantly undermines safe driving. Some serious faults are considered immediate failures, and others contribute to failure thresholds depending on severity and context.
Dangerous Fault (failure): A fault where the candidate’s actions actually endanger the examiner, other road users, or property. Dangerous faults are immediate fails.
Common areas assessed and typical faults Examiners assess practical driving across many competencies. Below are key areas and examples of faults that can be recorded (note: context matters; an action might be minor in one situation and serious/dangerous in another).
Observation and Mirror Use
Failing to check mirrors before signaling, changing speed or direction — common minor fault; repeated omissions escalate.
Poor observation at junctions, roundabouts, lane changes — can be serious if it places others at risk.
Not checking blind spots where required — can be serious/dangerous.
Controls and Vehicle Handling
Poor clutch control, stalling (especially in busy traffic) — usually a driver fault; repeated or dangerous stall could escalate.
Harsh braking or acceleration — driver fault; causing loss of control or endangering others can be serious/dangerous.
Incorrect use of gears (e.g., inappropriate gear selection for speed/gradient) — usually driver fault; can be serious if it compromises control.
Positioning and Lane Discipline
Incorrect lane positioning, straddling lanes, drifting — minor to serious depending on context.
Failure to follow lane markings or signals — can be serious, especially on dual carriageways or when turning.
Speed and Control
Exceeding the speed limit or driving too slowly for conditions — serious if it creates danger.
Failure to adjust speed for hazards, junctions, crossings — often a serious fault.
Junctions, Roundabouts, and Turning
Failing to give way correctly — serious or dangerous depending on consequences.
Incorrect speed or approach to roundabouts — can be serious.
Unsafe turning, cutting corners, swinging wide — may be serious.
Signaling and Communication
Incorrect, late or no signaling — driver fault; causing confusion or hazard can be serious.
Leaving indicators on or failing to cancel — minor fault unless it misleads other road users.
Pedestrian Crossings and Vulnerable Road Users
Failing to give way to pedestrians at crossings — serious/dangerous depending on severity.
Poor awareness of cyclists, motorcyclists, or pedestrians — can be serious.
Reversing and Parking
Poor observation or control when reversing — driver fault; reversing into traffic or hazards can be serious/dangerous.
Unsafe parking or failure to use mirrors — faults vary by context.
Independent Driving
Following directions or signage safely—errors in navigation are allowed but not penalized if not unsafe. Poor observation/decision-making while doing independent driving can attract faults.
Fault-weighting and examples of immediate fail items
Immediate fail (dangerous or serious): collisions, failure to stop at red light, running into pedestrians, dangerous overtaking, causing a hazardous situation that requires intervention.
Other likely immediate fail behaviors include:
Carrying out a maneuver likely to cause a collision.
Failure to stop when reasonably necessary (e.g., stop sign, red light, school warden).
Reckless/very poor observation at junctions and roundabouts resulting in potential collision.
Using a mobile